Knowing how to screen record on Mac can be useful when you need to demonstrate something that would be difficult to explain with a single screenshot.
You might want to record:
- A software tutorial
- Steps for fixing a computer problem
- An online presentation
- Something happening inside an application
- A demonstration for a coworker or friend
- A video you want to reference later
Fortunately, Macs include built-in screen-recording tools, so you don’t necessarily need to install additional software.
Apple provides screen recording through the Screenshot app and QuickTime Player.
In this guide, we’ll explain the easiest ways to record your Mac screen, how to include your microphone and where to find your recordings afterward.
Quick Answer: What Is the Screen Recording Shortcut on Mac?
The most important shortcut to remember is:
Shift + Command + 5
Press those three keys together.
The Screenshot toolbar will appear near the bottom of your screen.
From there, you can choose to record your entire screen or a selected portion.
On current versions of macOS, additional recording choices may be available depending on the version you’re running. Apple notes, for example, that recording a selected window is available in macOS Tahoe 26 or later.
For most people, Shift + Command + 5 is the easiest way to start.
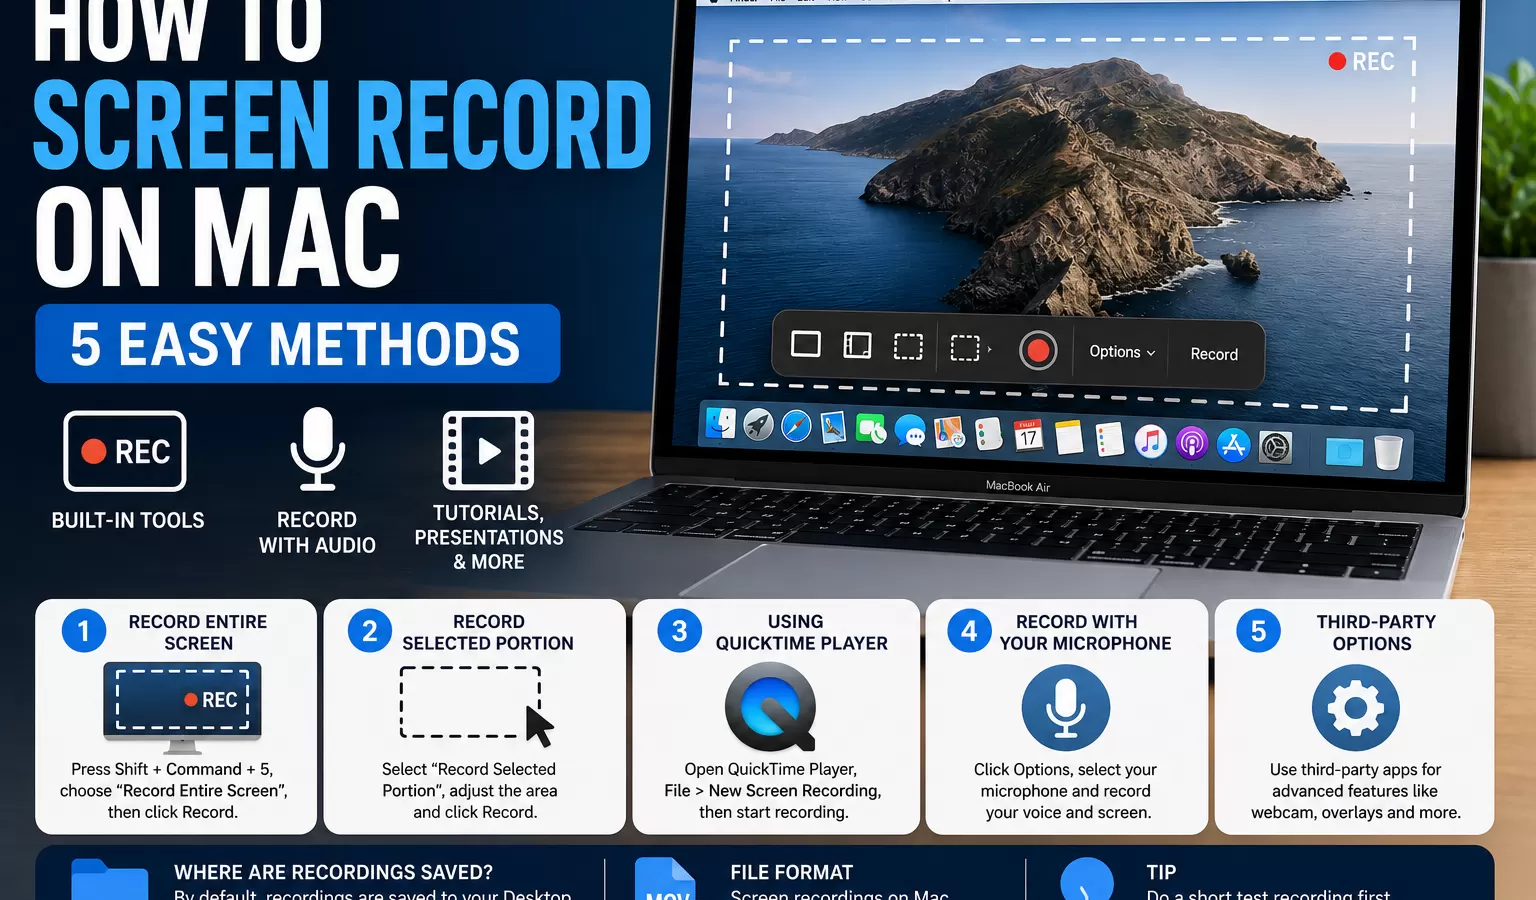
Method 1: Record Your Entire Mac Screen
Press:
Shift + Command + 5
The Screenshot toolbar will appear.
Look for the screen-recording controls.
Choose:
Record Entire Screen
Then click:
Record
Your Mac will begin recording the display.
Perform whatever actions you want to capture.
When you’re finished, use the Stop button in the menu bar.
Apple’s Screenshot app supports recording the entire display as a video.
Method 2: Record Only Part of the Screen
Sometimes you don’t want everything on your desktop appearing in the video.
Press:
Shift + Command + 5
Choose:
Record Selected Portion
A frame will appear around the area that will be recorded.
Adjust the frame until it covers exactly what you want to capture.
Then click:
Record
Only that portion of the screen will be included.
This can be particularly useful for tutorials because it prevents unnecessary applications, browser tabs or desktop items from appearing in the final video.
Apple allows the selected recording region to be resized by dragging its borders.
Method 3: Screen Record With QuickTime Player
Another built-in option is QuickTime Player.
Open:
Applications → QuickTime Player
Then select:
File → New Screen Recording
On current versions of macOS, this may open the same Screenshot controls used by Shift + Command + 5.
QuickTime also has a useful keyboard shortcut for starting a new screen recording:
Control + Command + N
From there, choose what you want to capture and start recording.
QuickTime is particularly convenient because after recording, you can open the video and perform basic tasks such as viewing or editing it.
Method 4: Screen Record on Mac With Your Microphone
If you’re making a tutorial, you may want to record your voice while demonstrating something on your screen.
Press:
Shift + Command + 5
Then select:
Options
Look for the microphone settings.
Choose the microphone you want to use.
Then start your screen recording.
Your voice can now be included along with the screen capture. Apple documents microphone selection as one of the recording options available when creating a screen recording.
This is useful for:
- Tutorials
- Presentations
- Software demonstrations
- Technical explanations
- Training videos
Before recording something important, make a short test video and listen to it.
This helps confirm that your microphone is working properly.
Method 5: Use a Third-Party Screen Recorder
The built-in macOS tools are enough for many users.
However, you may eventually need features beyond basic screen recording.
Third-party recording applications can be useful when you need things such as:
- Multiple video sources
- Webcam overlays
- Advanced microphone controls
- Multiple scenes
- Streaming
- More advanced video production tools
For a simple tutorial or demonstration, however, try the Mac’s built-in tools first.
You may not need additional software at all.
Mac Screen Recording Shortcuts
Here’s a quick reference:
| Action | Shortcut |
|---|---|
| Open Screenshot controls | Shift + Command + 5 |
| New QuickTime screen recording | Control + Command + N |
| Stop a QuickTime recording | Command + Control + Esc |
Apple documents Shift + Command + 5 as the shortcut for opening Screenshot and Control + Command + N as the QuickTime shortcut for a new screen recording.
If you only remember one shortcut, remember:
Shift + Command + 5
How to Stop Screen Recording on Mac
Once you’ve captured what you need, you need to stop the recording.
Look at the menu bar at the top of the screen.
Click the Stop Recording button.
When using QuickTime’s recording workflow, Apple also documents:
Command + Control + Esc
as a way to stop the recording.
After stopping, your recording can be saved and opened for viewing or editing.
Where Do Screen Recordings Go on Mac?
By default, recordings created through the Screenshot app can be saved to the desktop.
Apple notes that automatically saved screen recordings use filenames containing the date and time, such as a filename beginning with Screen Recording.
That makes them relatively easy to identify.
If you just finished recording and can’t find your video, check your desktop first.
How to Change Where Screen Recordings Are Saved
You don’t have to save every recording to your desktop.
Press:
Shift + Command + 5
Select:
Options
From there, you can choose where you want your recording to be saved.
If you record your screen frequently, consider creating a dedicated folder such as:
Screen Recordings
That can help keep your desktop organized.
How to Screen Record on Mac With Audio
There’s an important distinction between different kinds of audio.
If you want to record your voice, choose a microphone through the recording options.
Press:
Shift + Command + 5 → Options
Then select your microphone.
Apple specifically documents microphone selection for recording your voice or other sound picked up by the microphone.
However, recording audio produced internally by every application can behave differently depending on the application, macOS version and permissions.
Don’t assume that selecting a microphone automatically captures every sound generated by the computer.
Always make a test recording first.
How to Screen Record on MacBook Air
The process is the same on a MacBook Air.
Press:
Shift + Command + 5
Choose whether you want to record the entire screen or a selected portion.
Then start recording.
You don’t need a separate screen-recording program for basic recordings.
How to Screen Record on MacBook Pro
MacBook Pro users can also press:
Shift + Command + 5
to access screen-recording controls.
Alternatively, open:
QuickTime Player → File → New Screen Recording
The same basic workflow applies across modern Mac computers.
How to Record Only One Area of the Screen
Press:
Shift + Command + 5
Choose:
Record Selected Portion
Move and resize the recording frame until it surrounds the area you want.
Then click:
Record
This is one of the best options for creating clean tutorials because viewers only see the relevant part of your screen.
Can You Record a Single Window on Mac?
This depends partly on your macOS version.
Apple’s current documentation says Record Selected Window is available in macOS Tahoe 26 or later.
On other versions, you can instead choose Record Selected Portion and position the recording area around the window you want to capture.
This is why the available controls may look slightly different between two Macs running different macOS versions.
How to Show Mouse Clicks in a Screen Recording
For tutorials, showing where you’re clicking can make the video easier to follow.
Recording options can provide pointer and click controls depending on the recording workflow and macOS version.
Apple’s QuickTime documentation, for example, describes an option for displaying a circle around the pointer when clicking.
This can be particularly useful when creating instructional videos.
How to Edit a Mac Screen Recording
Once you’ve finished recording, you may want to remove unnecessary footage from the beginning or end.
QuickTime Player includes basic editing capabilities.
For example, QuickTime can be used to trim and perform other common edits on video.
For a simple tutorial, trimming the beginning and end may be all you need.
More complicated videos may require a dedicated video editor.
What Format Are Mac Screen Recordings?
Apple says screen recordings created with the built-in Mac tools are saved as:
.mov
files.
MOV files can be opened with QuickTime Player and other compatible video applications.
Why Is Mac Screen Recording Not Working?
If you can’t record your screen, check a few things.
Check the Shortcut
Press:
Shift + Command + 5
Make sure all three keys are pressed together.
Check macOS Permissions
Applications that need to capture your screen may require permission in macOS privacy and security settings.
If a third-party application can’t record your screen, review its permissions.
Check the Application
Some applications may prevent their content from being recorded.
Apple specifically notes that some apps, such as the Apple TV app, may not allow their windows to be recorded.
Restart the Application
If recording suddenly stops working, close the application and reopen it.
You can also restart your Mac if necessary.
Why Is There No Audio in My Screen Recording?
If you expected your voice to appear in the recording, check the microphone setting before recording.
Press:
Shift + Command + 5
Then:
Options
Make sure the correct microphone is selected.
Also check that macOS has granted the necessary microphone permission.
Make a short test recording before creating a long video.
Screenshot vs. Screen Recording on Mac
A screenshot captures one still image.
A screen recording creates a video.
If you only need to capture:
- An error message
- A webpage
- One setting
- A conversation
- A single moment
a screenshot is usually faster.
We have a complete guide explaining how to screenshot on Mac, including the main Mac keyboard shortcuts.
If you need to demonstrate multiple steps, screen recording is usually the better option.
How to Screen Record on Windows Instead
Windows also includes built-in recording tools.
Depending on your Windows version and what you want to capture, you can use tools such as Snipping Tool or Xbox Game Bar.
If you’re using a PC, see our complete guide on how to screen record on Windows.
That article covers Windows 11, Windows 10, Xbox Game Bar and the main recording shortcuts.
Mac vs. Windows Screen Recording
Both operating systems include useful built-in tools.
On Mac, the shortcut worth remembering is:
Shift + Command + 5
On Windows, Xbox Game Bar users can use:
Windows + Alt + R
The exact tools differ, but both systems can handle basic screen recording without requiring additional software.
Tips for Better Mac Screen Recordings
Before starting your recording:
- Close private messages.
- Hide sensitive information.
- Close unnecessary browser tabs.
- Disable distracting notifications.
- Check your microphone.
- Prepare the steps you’re going to demonstrate.
- Make a short test recording.
If you’re creating a tutorial, keeping the recording focused can make it much easier for viewers to follow.
Frequently Asked Questions
What is the shortcut to screen record on Mac?
Press Shift + Command + 5 to open the Screenshot toolbar, which includes screen-recording controls.
Does Mac have a built-in screen recorder?
Yes. macOS includes built-in screen recording through the Screenshot app and QuickTime Player.
How do I screen record on a MacBook?
Press Shift + Command + 5, select the recording option you want and start recording.
How do I record only part of my Mac screen?
Press Shift + Command + 5, select Record Selected Portion, adjust the recording area and click Record.
Where are Mac screen recordings saved?
By default, Screenshot recordings can be saved to the desktop. You can change the save location through Shift + Command + 5 → Options.
Can I record my voice while screen recording?
Yes. Select a microphone through the Screenshot recording options before starting.
What format does Mac use for screen recordings?
Apple’s built-in screen recordings are saved as MOV files.
Can QuickTime record my Mac screen?
Yes. Open QuickTime Player and choose File → New Screen Recording.
The Bottom Line
Learning how to screen record on Mac is straightforward because the tools you need are already built into macOS.
For most people, the easiest method is:
Shift + Command + 5
Use it to open the Screenshot toolbar and choose what part of your screen you want to record.
You can also use QuickTime Player when you want another built-in way to start and work with a screen recording.
If you’re creating a tutorial, select your microphone before recording and make a short test clip first.
Once you know these controls, recording your Mac screen takes only a few seconds.